Colors
Creating Colors
Representing colors in Helm is pretty straightforward. All colors are stored as RGBA values, with each component (R, G, B and A) being a 64-bit floating point value. This has an advantage over the regular way of representing RGBA colors (with each component being represented as a single byte) because it allows a higher range of colors to be composed. Unfortunately this higher range of colors is still clamped to a 32-bit color when being rendered to the screen, but it is still incredibly useful for accurately calculating things such as complementary colors, averaging colors, etc.
To create colors you can use the following functions as explained in the Helm.Color documentation:
rgba :: Double -> Double -> Double -> Double -> Color
rgb :: Double -> Double -> Double -> Color
hsva :: Double -> Double -> Double -> Double -> Color
hsv :: Double -> Double -> Double -> Color
The rgb function just takes three double values (red, green and blue)
that should be in the range 0.0 to 1.0, where 0.0 is no color and 1.0
is full color. The rgba function is basically the same except it takes an
additional double value for the alpha component (or transparency), where 0.0
is completely transparent and 1.0 is opaque. In other words, rgb creates
a solid color (with an alpha value of 1.0) and rgb can create a variably
transparent color.
For those who prefer HSV (or if you need to do complex color operations in HSV
space), there is also the hsv and hsva functions. These functions simply
convert from HSV[A] space to RGB[A] — the final representation of the
color remains in RGBA form.
Using Colors
There are many functions that use colors, such as filling or outlining shapes. Check out the Helm.Graphics2D documentation for some examples of these functions.
Colors can be applied directly to shapes to create “forms” of them that are filled with the color, or can be applied to line styles or gradients which are then applied to shapes.
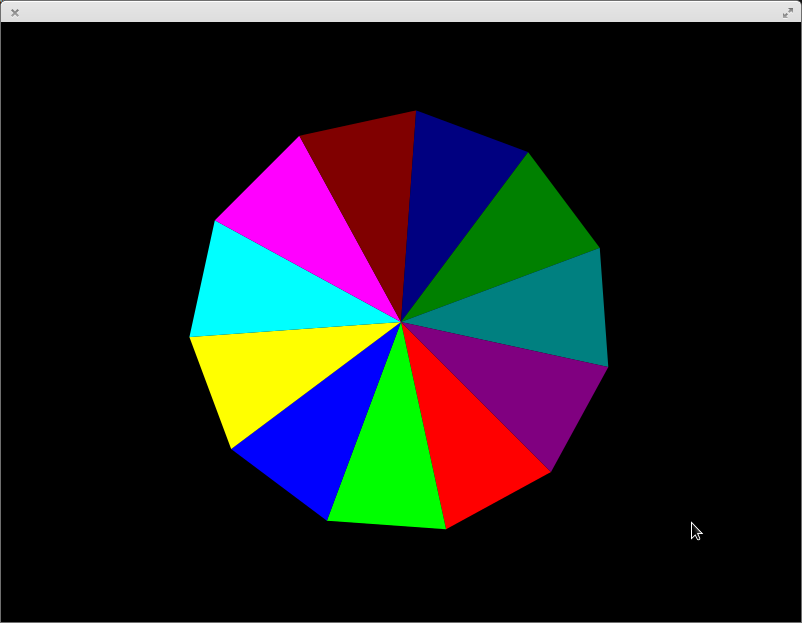
Creating a Color Wheel
Let’s try making something familiar with our new-found knowledge of colors in Helm — a color wheel. We want to end up with something that looks like a pizza made up of differently-colored slices. First let’s define a list of colors we actually want to appear in the color wheel:
red :: Color
red = rgb 1 0 0

lime :: Color
lime = rgb 0 1 0

blue :: Color
blue = rgb 0 0 1

yellow :: Color
yellow = rgb 1 1 0

cyan :: Color
cyan = rgb 0 1 1

magenta :: Color
magenta = rgb 1 0 1

maroon :: Color
maroon = rgb 0.5 0 0

navy :: Color
navy = rgb 0 0 0.5

green :: Color
green = rgb 0 0.5 0

teal :: Color
teal = rgb 0 0.5 0.5

purple :: Color
purple = rgb 0.5 0 0.5

colors :: [Color]
colors =
  [ red
  , lime
  , blue
  , yellow
  , cyan
  , magenta
  , maroon
  , navy
  , green
  , teal
  , purple
  ]
Helm doesn’t allow assigning specific colors to specific points in a polygon, so we need to create a polygon for each slice in the color wheel. A good start on a function fingerprint for a function to create one of these slices is something like the following:
slice :: Int -> Form eWhere the given integer is the index of the color in the color list. The reason we take the index instead of the color itself is so we can calculate the position of the points in the slice polygon relative to the other colors (remembering that each color is going to be assigned its own slice).
We also have to give the Form type a concrete type to parameterize over,
since a Form only makes sense in terms of a graphics engine. Luckily, we can
just be agnostic about this and give the generic (forall) type e, for
engine. Let’s define the core of this function that we’re going to use to
build the actual slice generating code:
slice :: Int -> Form e
slice n = filled color $ polygon (path points)
  where
    color = colors !! n
    r = 150
    points = [{- ... -}]
The color variable has been defined as the color in colors at index n
(i.e. the color we want to paint the slice) and r is a constant representing
the radius of the color wheel. This won’t actually render anything yet, because
the points variable is just a blank list, so the path generated by path
will just be empty. Let’s think about how we actually calculate the points for
the slice polygon.
Firstly, let’s only use 3 points for the slice. This means that the outer edge of the slice will unfortunately be straight, but making it smooth is over-complicating it for this first simple example. The first point will be at the center of the color wheel (all slices will have this point in common), the second point will be at some arbitrary point on the circumference of the color-wheel and the third will be along the circumference at some fixed increment from the second point.
Essentially, in order to construct the slice we need to think of the whole
color wheel as containing exactly 2 * pi radians (i.e. a circle). Then we can
calculate this fixed increment by dividing all of these radians up into a
certain amount of radians allocated to each slice, based on the number of
slices (or number of colors). Let’s model this thought process in actual code:
import Linear.V2 (V2 (V2))

slice :: Int -> Form e
slice n = filled color $ polygon points
  where
    color = colors !! n
    r = 150
    increment = 2 * pi / realToFrac (length colors)
    t1 = increment * realToFrac n
    t2 = t1 + increment
    points = [V2 0 0, {- ... -}]
Note that we import 2-dimensional vectors from Linear. This is almost
always how 2D quantities will be represented.
We’ve now defined increment which, as previously mentioned, is the amount of
radians allocated to each slice. The variables t1 and t2 are the angle
where the nth slice starts and the angle where the slice after it
starts, respectively. We have the angles, now we need to figure out how to find
the actual points that represent the outside edge of the slice. To do that we
need to remember the concept of the unit circle and the equations
x′ = r cos(θ)
and
y′ = r sin(θ).
pointOnCircum :: Double -> Double -> V2 Double
pointOnCircum r theta = V2 (r * cos theta) (r * sin theta)
Using this newly defined function will finally result in what we want: a colored slice on our color wheel.
slice :: Int -> Form e
slice n = filled color $ polygon (path points)
  where
    color = colors !! n
    increment = 2 * pi / realToFrac (length colors)
    t1 = increment * realToFrac n
    t2 = t1 + increment
    r = 150
    points = [V2 0 0, pointOnCircum r t1, pointOnCircum r t2]
Rendering
Now that the business logic is done, we just need to place it into a little bit of boilerplate code that defines the skeleton for a Helm game. Since right now we just have some static polygons being rendered without any animation or user interaction, we won’t explicitly need a lot of it, but it will serve you well in the future when making games.
First, let’s make sure we’re importing the stuff we need for the code that
we’ve already written. We’re using the Color type and the rgb function, so
we have to import Helm.Color. We’re using the Form type and functions like
filled and color, so we’ve got to import Helm.Graphics2D. The rest so far
is covered by the Prelude, so that’s all we need for now.
We’ll need an engine to do the rendering of the polygonal forms we’re making,
and since that involves some nasty I/O to start up, we’ll do it inside of the
IO monad of the main function. First we will
import qualified Helm.Engine.SDL as SDLand then, within main, we initialize the SDL engine:
main :: IO ()
main = do
  engine <- SDL.startupWith $ SDL.defaultConfig
    { SDL.windowDimensions  = windowDims
    , SDL.windowIsResizable = False
    }
This starts up the SDL engine, using the default configuration with some record
update syntax. We update the “default” record to set the dimensions of the
display window to our own value instead of the default and also to make it
non-resizable. Then we bind our started-up engine to engine. The window
dimensions are specified as a 2-dimensional vector, so we can specify
windowDims like so:
windowDims :: V2 Int
windowDims = V2 800 600
Now the engine is ready to be “run”. But we need to tell it what to run.
Luckily, Helm provides a nifty record type called GameConfig that simply
allows us to plug in four functions. One is called at the very beginning of
execution, initializing the game (initialFn). One allows for “subscriptions”
to be registered with the engine (subscriptionsFn), causing an update every
time something occurs (i.e., based on a signal), like user input or a time
frame (a time frame occuring about every 0.01667 seconds for a 60 FPS game).
One is updateFn, which is called every time a subscription is triggered and
can take in the state of the game and return a new (updated) one, and also can
execute commands (basically I/O actions). Finally, viewFn is called every
time the game is rendered to the screen, and its job is to use the state of the
game to produce graphics that can be rendered. This is what our set-up will
look like; this also goes in the do block of our main function:
run engine GameConfig
  { initialFn       = initial
  , updateFn        = update
  , subscriptionsFn = subscriptions
  , viewFn          = view
  }
And since we’re using run and GameConfig, we’ll need to import Helm.
Now it remains to simply fill in these four function bodies. Since we don’t have any animation or user interaction, only one of the functions will have anything interesting, so let’s start there:
view :: Model -> Graphics SDL.SDLEngine
view Model = Graphics2D
  $ center windowCenter
  $ collage [slice n | n <- [0..length colors - 1]]
Here, we’re using the collage function from Helm.Graphics2D to put some
Forms together into a Collage that can be accepted by the rendering engine.
We use a list comprehension to essentially map each color in colors (by
index) to a slice, all of which are incorporated into the Collage. Then we
use center to center our Collage about a certain point. In this case, that
point is windowCenter, which we can define thusly:
windowCenter :: V2 Double
windowCenter = (fromIntegral.(`div` 2)) <$> windowDims
This simply halves the x- and y-dimensions of the window and converts their
values to Double.
Now we can fill in the uninteresting functions:
initial :: (Model, Cmd SDL.SDLEngine Action)
initial = (Model, Cmd.none)

update :: Model -> Action -> (Model, Cmd SDL.SDLEngine Action)
update Model DoNothing = (Model, Cmd.none)

subscriptions :: Sub SDL.SDLEngine Action
subscriptions = Sub.none
The initial function here is yielding an initial Model of the “game”, along
with some initial IO action to perform. Since we don’t need a model, really, we
just substitute in a bogus datatype data Model = Model (we use data only
because normally this would be a much larger data type) in here. There’s no
outgoing command, so we can use Cmd.none after we import qualified Helm.Cmd
as Cmd.
update does a similar thing, but only does so given the current Model of
the game and the associated Action that triggered the update. Since there are
no actions here, we again use a bogus datatype data Action = DoNothing.
Our game has no subscriptions, so we simply import qualified Helm.Sub as Sub
and use Sub.none.
Final Product
The final product renders a (flat-edged) color wheel with 11 CSS-named colors on it.
Getting Started
- Introduction
- Installing
Drawing
- Colors ←
- Gradients
- Curves and Animation
© 2013-2014 Switchface Studios