Gradients
The code for this guide can be assembled using the “Rendering” portion of the last guide as a skeleton.
Color Stops
Helm’s drawing API supports both linear and radial gradients. Independent of a radial or linear gradient is the concept of color stops, which are a tuple pair of a percentage describing at what point the color should be placed along the path taken by the point and, of course, the color itself. For example, the following list of color stops would result in the starting point of the gradient being black and then transitioning to white by the end of the gradient:
white :: Color
white = rgb 1 1 1

black :: Color
black = rgb 0 0 0

stopsA :: [(Double, Color)]
stopsA = [(0, black), (1, white)]
(…adding in white and black colors which were not used in the last guide.)
And for reference, a list of stops that evenly transitioned from black to red to yellow would like:
stopsB :: [(Double, Color)]
stopsB = [(0, black), (0.5, red), (1, yellow)]
Creating Gradients
According to the Helm.Color documentation, the two functions for creating gradients have the following type signatures:
linear :: (Double, Double) -> (Double, Double) -> [(Double, Color)] -> Gradient
radial :: (Double, Double) -> Double -> (Double, Double) -> Double -> [(Double, Color)] -> Gradient
The linear signature is the more obvious of the two. It takes a starting
position (in the form of a tuple), an ending position, and a list of color
stops, creating a new gradient value. The gradient created will essentially
compute the line segment from the starting position to the ending position.
Then, for each of the percentage values in the color stops, the gradient will
transition to the color stop’s color at that percentage along this line
segment. Using this knowledge, let’s try declaring a linear gradient using the
linear function and the second list of color stops we previously defined,
stopsB.
linearGrad :: Gradient
linearGrad = linear (0, 0) (0, 100) stopsB
According to this definition, linearGrad is a linear gradient that
transitions from black to red at (0, 50) and then finally yellow at
(0, 100). It’s important to note that gradients need to be defined in pixel
coordinates relative to the shape that it is applied to. For example, if
linearGrad was used with a rectangular shape with height 100, the black
part would start at the top side and the yellow part would finish at exactly
the bottom side.
On the other hand, the radial function takes a starting position, a starting
(or initial) radius, an ending position, an ending radius, and a list of color
stops. Radial gradients start at an initial position with an initial radius,
essentially transitioning towards the end position and radius in a radial
shape. The following is an example declaration of a radial gradient using the
previously defined stopsA:
radialGrad :: Gradient
radialGrad = radial (0, 0) 0 (0, 0) 64 stopsA
This creates a radial gradient that starts at (0, 0) with an initial radius
of 0. It doesn’t translate towards an end position because it’s the same as
the starting position, instead growing to a circle of radius 64.
Creating Forms from Gradients and Shapes
Helm.Graphics2D
provides a function to create a form from a gradient and shape, in a similar
manner to the previously discussed filled function.
gradient :: Gradient -> Shape -> Form eWith that in mind, let’s create a rectangle and a circle to show off the linear and radial gradients we just made, respectively.
Rectangle
To create a rectangular Shape, we can just use the rect function like so:
rect (V2 300 100)The above creates a rectangle of type Shape with a width of 300 and a height
of 100. Then, we can use gradient to apply linearGrad to it:
gradient linearGrad $ rect (V2 300 100)Thus creating a Form representing the same rectangle but filled in with our
gradient. Finally, we’ll move the rectangle towards the center of the screen
(the coordinate system uses the upper-left of the window as its origin) by 100
units along the x and y axes and name our final Form as gradientRect:
gradientRect :: Form e
gradientRect = move (V2 100 100) (gradient linearGrad $ rect (V2 300 100))
Circle
A similar process applies to making the circle. We will specify the circle as having a radius of 64 units and we’ll move it 500 units left and 300 down:
gradientCircle :: Form e
gradientCircle = move (V2 500 300) (gradient radialGrad $ circle 64)
Creating a View of the Shapes
In order to show these two Forms, we can simply batch them together into a
Collage by passing them as a list to collage. Then they will be accepted
for further rendering by a Graphics:
view :: Model -> Graphics SDL.SDLEngine
view Model = Graphics2D $ collage [gradientRect, gradientCircle]
Final Product
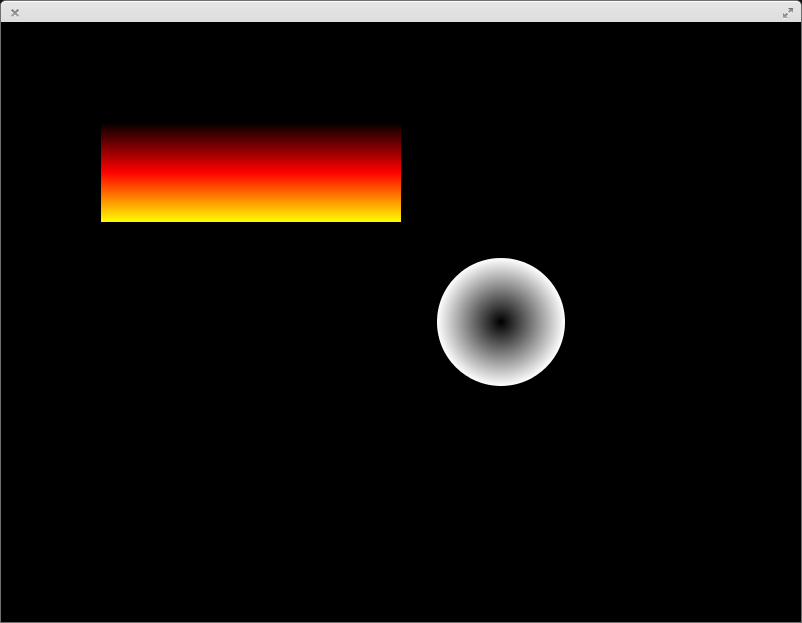
The final product renders a 300×100 rectangle at (100, 100) filled
with the linearGrad gradient, and a circle with a radius of 64 at
(500, 300) filled with the radialGrad gradient.
Getting Started
- Introduction
- Installing
Drawing
- Colors
- Gradients ←
- Curves and Animation
© 2013-2014 Switchface Studios